


Intro to Gardening: Planting and Water
A short discussion and some tips on planting/watering your food

At this point we’ve planned out our spaces, assembled some beds (or not), laid some soil, and now it’s time to start growing some food. This article is going to be split into a pair of sections, the first covering planting seeds and spacing; the second, will cover how and when to water, as well as some hands free watering methods, and a little on water collection. Let’s jump in!
Planting your seeds: When, where, and how!
The beauty of planting from seed is that nowadays, there isn’t a ton of mental work that has to go into the process. The majority of seed packets are going to provide you with every bit of information you could need. So let’s take a look at one of those and break down what all that info is:
Here’s the backside of a packet of Brandywine variant tomato seeds.
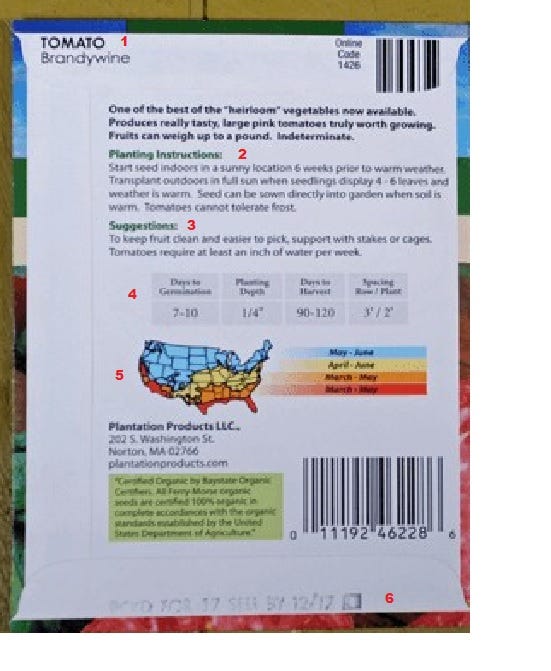
This is where you’ll find the name, usually the generic, and the varietal of whatever it is you’re planting. It’s self-explanatory.
Here’s the baseline “how to put this in the ground correctly” instructions as intended by the producer. Most of the time, they’ll recommend you start your seeds indoors ahead of the growing season to give you more time to grow more stuff. It’s not 100% necessary but does make life easier. If you choose to just plant straight into the garden, be sure to wait until after the last frost for your area as to not have your plants start, then die immediately due to cold.
This area is usually got some kind of tip about maintaining or pruning the plant so to maximize your yields, or prevent disease/insects/etc from eating it.
This area is the recommended info on how to plant and how long it should take to grow. You’ll notice there is a section on spacing. It’s worth noting the baseline recommendations for spacing on things like lettuce, corn, soybeans, etc. are all in relation to factory farms. You can (assuming your soil is nutrient dense) space you plants much closer together. I tend to space most plants about 2” apart, regardless of what it is. For things like tomatoes, cucumber, etc., you can set up a trellis, or post, and let them grow vertically, thus allowing you to grow more stuff in limited space1. The germination timeline is a window, but it’s good to keep an eye on so if it’s been 2 weeks for example and some of those seeds haven’t sprouted, you can assume they won’t and plant some more in those spaces, or thin out growing plants into those spaces. The Days until harvest is also a window where the minimum time is for optimal conditions, and the max time is usually the last of the harvest.
Most seed packets will have a mini planting zone map and some rough info on when you should start planting. You can always refer to a farmers almanac for specific dates, but mostly, if you’ve lived somewhere more than a few years, you’ll know the quirks of that area’s weather and can prepare as such. We’ll discuss it a bit more in a moment.
Most seed packets will come with an expiration or best buy date, just like you see on food. This date is the day the producer assumes the seeds will still have a proper germination rate. However, if stored properly in a cool, dry, dark area, you can store seeds for many years. Of course over time, some seeds may become less likely to sprout, but for the most part, you shouldn’t stress these dates too much.
Now let’s circle back and talk about that funky colored map:
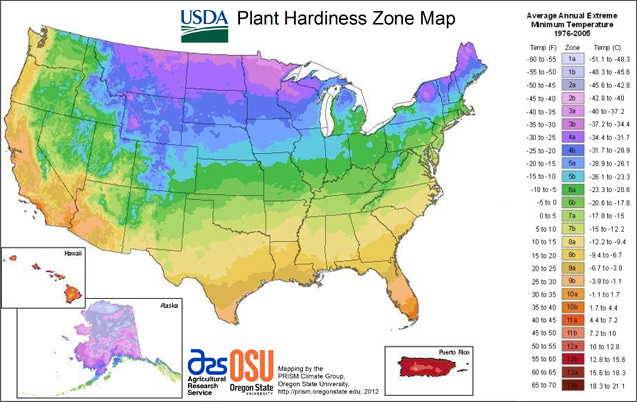
This map generally shows the the lowest possible temperature for any given area across the US. Why this matters, is that some plants have not only light and water requirements, but temperature ones as well. What that means for you is if you live in southern Alabama/Mississippi you can pretty much start planting in late February/early March, and run deep into November. Parts of California and Florida can garden all year round. If you live in Michigan or Maine, you’re going to start later (unless starting seeds indoors or using a greenhouse) and end earlier. You’re growing season is going to be late April to September (give or take).
Most seed packets will tell you what hardiness zone is preferred. BUT! An important thing to note is that those “preferences” refer to early spring planting. You can grow any crop, anywhere, anytime, if you are willing to put in the work to alter the conditions of your area. By that I mean using greenhouses, growing indoors under grow-light setups, etc. So remember that this is simply a simple guideline, not a hard and fast rule set.
Water: The thing that makes or breaks your entire system
When it comes to watering plants, the common knowledge is to water in two small spurts each day for high water crops, or every other day for most others. A brief watering in the morning, a little after sunrise; and a another in the evening, a little before sunset. The point of this is to maximize the amount of water that is making it too the roots. The more water the roots can drink up, the bigger your plants grow. The reason for the time is the sun is softer and not as hot meaning two things: 1) Your water isn’t going to evaporate away before it has a chance to soak into the ground, and 2) you aren’t going to torch your plants.
You see, water droplets can function as mini magnifying glasses and if they sit on your plants leaves during the middle part of the afternoon, the sun is basically scorching those leaves, which can kill your plants. Its why most places don’t allow timed sprinklers to run during mid day (or the places that do often have dead grass) as it’s a waste of water. So keeping to an early morning, late evening schedule is optimal. Epic Gardening has a great couple of videos on watering plants (both garden and indoor) which can give you some visuals on why the suggestion is as such.
But what happens if you live in a very dry climate, water isn’t super prevalent, etc. Well, luckily there are a few pretty good options for making sure your plants have what they need without going broke from water bills, or just hoping the rain gets you there.
One of the better options and a common one for arid climates is to use Olla Pots:

Basically, this is an UNglazed clay pot, you bury in the ground up to the neck and fill with water. Then you plant around it. The water you put in the pot with slowly leech out through the clay as the soil dries ensuring the roots of the plants always have access to water when they need it. Additionally, if the soil is moist, the pots won’t filter water out because the pots simply act as a barrier to even out moisture levels between the inside and outside. So moist soil means there’s water on both sides and everything is copacetic. You can see it somewhat in action here.
Alternatively to Olla pots, you can use things like an inverted wine bottle or some various above ground globe spikes. They all function on a similar idea with the goal being to slowly release water into the soil to maximize root uptake.
In addition to your various watering methods and styles, adding a mulch of some type over the top of your soil can greatly reduce evaporation and reduce the amount you have to water. Mulch can be anything from newpaper to wood chips, to large plant matter dropped around the base of the pants. Some plants like Comfrey, grow massive leaves and are an excellent source of organic material for the garden. Planting a few comfrey plants and using a “chop and drop” method of layering out the leaves as mulch can retain soil moisture as well as add nutrition over time.
Lastly, let s take a brief moment to discuss water collection. In a majority of places around the US, collecting rainwater is illegal. Who cares? The government doesn’t and shouldn’t be allowed by our tacit consent to own the rain, local or otherwise. You should be collecting rain water from your house to use in your garden space or for any other grey-water needs (filling toilets, washing your car, etc). An excellent primer article on collecting rain water can be found here. Rain barrells are usually your best price-amount option, but if you get a ton of rain (like the PNW, or SE) you may not even need all that. A few 5 gallon buckets or a trash can with the lid left off can collect a great deal of water to be used in the garden later on. The article linked above discusses using your gutter system to filter all the rain that hits your roof into a tank of some kind which, while optimal, can be expensive.
Whatever you choose to do, it’s important for building the network to have access to water. Even in a pinch that rain water from the barrells/buckets can be purified to drink so don’t underestimate the value in collecting it.
I think that should get you started at the least to get out and plant some stuff. Next week we’ll be moving on to the community defense portion of the five steps and leaving the gardening behind, at least for a bit. Thanks for reading along and we’ll see you next time!
-EQ
Especially for things like tomatoes and cucumbers, I strongly recommend watching MIGardener’s tutorials, as he discusses an excellent pruning method for those plants which will ensure you’re growing a ton of veggies, and not just a bunch of leaves.