


Intro to Gardening: Building the soil
The more you do here, the less you do later.

On Monday we discussed planning and layout of the garden spaces for various areas and size limitations. We also alluded to composting, which will be the focus of this piece. So lets start with the ultra basics: What is composting? Composting is the process by which natural materials such as food scraps, leaves, etc are broken down and become nutrient rich soil. So for today, we’re gonna discuss a couple of different ways by which you can do it.
Method 1: Compost Piles
There are two primary ways by which you can build a “compost” pile to break down these organic materials into soil: Cold and Hot. We’ll start with cold composting, or as nature calls it, composting. Cold Composting is a wholly natural process which you can see in any forest location over time. As you walk along a trail you’ll see any amount of fallen leaves, and if you pick them up, under them will be some partially decomposed leaves, and under them, smaller and smaller bits until you reach the soil layer. This is how nature replenishes its nutrient sources every year by dropping leaves, needles, etc on the ground and having them slowly decompose and create new top soil.
You can easily recreate this by setting aside a small area in your yard or buying a 35 Gal trash can and filling it with the various materials. As you use up food scraps, you toss the leftovers into the pile or bin to rot and decompose and go on about your life. This is a very slow process and one which can take months to properly build a working amount of soil/fertilizer to put back into your garden space. It also tends to run the risk of both a lot of bugs, and some pretty bad smells. Unmanaged piles often become what’s called Anaerobic, or “without Oxygen”. As such the pile will become home to molds and insects who will do the work of breaking down the organic material. That’s where the smell comes from.
The other option which is Hot Composting or the Berkeley Method1 is one which requires a fair amount more work and diligence, but can produce a lot more soil, in a much shorter period of time. Read the article in the footnote for all the steps and work involved there. The tl;dr of it however for those who take shortcuts, is you have to use a certain ratio of Greens and Browns (e.g., food scraps vs leaves) and by keeping it a certain level of moist, and flipping it over periodically with a pitchfork/shovel to add oxygen into the mix you create an aerobic system which means “with oxygen” that is full of microscopic life that does the heavy lifting for you. By maintaining the ratio and working the pile, it will also hit a pretty high temperature (thus the name hot compost) of around or above 160 degrees Farenhieght. What this means is: No bugs, no mold, very little smell, but lots more work.
There are pros and cons to both methods for sure, and a lot of it is dependent on how much time you have available to you. Don’t have the money or resources to start a garden for a year or so? Cold Composting is fine. Just throw your raked leaves and food scraps in a pile or bin and get to it when you get to it. Wanting to start planting next season? Hot Compost is the way to go.
It’s worth noting that compost (while an option to plant directly into for a great number of veggies) is generally intended to be an additive to the soil you’d be planting in and not the entire medium. There’s a number of different methodologies as far as planting large rows of crops on whether you till the compost into the soil or not. You can see more about it in a short article here.
Method 2: Direct Sowing
An alternative method of composting you can employ is the direct sowing method. This is exactly what it sounds like. Instead of building large piles of compost in which some percentage of nutrients can be lost to the ground under the pile (unless you plan on moving the piles around), you would simply collect some amount of materials, trench an area and then fill it with the compost. This method can work with either the Hot or Cold composting styles. By that I mean, you could collect a proper ratio of Greens and Browns to then mix up and bury in the trench, heavily soaking them before covering it back over. Or you could simply throw a bucket of old scraps into a hole and cover it up.
The benefits of direct sowing are that you don’t lose any nutrients to a part of your garden you weren’t planning on growing in, and it helps to ensure that the soil is truly built from whatever it is currently into a rich and nutrient dense material that goes much deeper than a standard tiller would allow. When I direct sow, I tend to dig 12-14” down and about 2-3’ across. From there I can fill the hole about 80% up with organic material and then cover it back over with a layer of dirt. This prevents any smells, bugs, or issues with managing a compost pile. It also has the added benefit of being a long term soil building solution. In my current back yard which is covered in about a 1-2’ layer of sand, I’ve been able too, over the last year, turn a great deal of it in certain areas into actual soil which can be planted into later.
The downside, is that this method is both: 1) It’s slow - Because you aren’t micro managing the pile to speed the process along (even if you fill it with HC ingredients), so you’re average time is around 4-6 weeks. Much faster than standard cold compost, but much slower than the hot method. And 2) If you have outside pets like dogs, or have animals like Racoons in your area, they will find and dig the holes up and get into it, which can be a hazard for your dog, or a hassle for you. In my case, my two pitbulls have a lot of food sensitivity due to abuse they suffered prior to us rescuing them. So if they run out and eat a ton of basically garbage out of the yard, they spend the next few days puking it up all over the house.
I have managed to reduce the problem by covering the area I direct sowed with tarp or plastic to keep the dogs out. But again, that will slow the process down as it misses out on rain/water and the temp situation isn’t ideal.
Method 3: Vermicomposting
This is an excellent method of composting if you happen to not have any issues with bugs, or in this case, worms. Specifically, Red Wigglers and Nightcrawlers. That’s right, your favorite fishing bait is also, easily your number one best gardening tool as well. Worm bins as they are often called are simply systems by which food scraps and other organic material is thrown into a bin with a number of worms, and as the material cold composts, the worms eat and process it down further. Why does this matter? Well, for a few reasons.
When you cold compost, your pile volume reduces greatly and is often by the time it’s done, coarse and chunky. When you hot compost, you maintain the volume and get a finer soil. Vermicomposting gives you the benefits of hot compost, with the labor of cold compost. Which means, you get the best of both worlds: Lazy and Efficient. In addition, the worms use very little of the nutrients that are in the organic matter which means all that good potassium, nitrogen, and more stays in castings. Castings of course being worm poop. Worms are basically a mouth, a stomach, and a butt. Which make them perfect for biodegrading organic material and leaving the good stuff behind.
A key thing to remember is that in your worm bin, you can’t use a hot compost method as the temps would end up killing the worms. So you would simply drop your scraps, and let it be. There are some great resources on worm bins which can be found on Youtube. Any of the sites I linked in my earlier article on 5 Keys to Non-violent Revolution will have more info and a good tutorial on how to build a worm bin.
A final note about these that’s worth mentioning. Worms can eat their body weight in food each day. So if you drop a pound of earthworms in a bin, you’ll need to supply them with at least a pound of material to eat each day. They also reproduce quickly. Worms will double in number approximately every 90 days depending on how cushy their conditions are. Which means over the course of a year, that initial one pound of worms you started with in January will become around 8 pounds of worms by Christmas time. Which isn’t always a bad thing. If you’re in a position to fish, it can supply you with not only a ton of great workers for your garden, but a ton of top tier bait for fishing.
In addition to worms, there are other insects such as soldier flies which can be used in a vermicomposting system. The Nature’s Always Right Youtube channel has a really cool design in which he uses the flies as a vermicompost bin, and as the larvae grow they exit the box and into another bin where they are eaten as a protein source for the chickens he’s raising. It’s an awesome little self sustaining system which I linked to a few videos on the subject.
Final Thoughts:
Regardless of which method you choose to employ, they all have their pros and cons and different ones work better for different people and places. The important thing is that the ground you currently have in your yard, or near your apartment isn’t in any condition to be planting food into, and you need to put in some effort to build good, high quality soil before you start planting. Using these methods will ensure that not only do you have good enough soil for your first planting, but you’ll be able to maintain great soil for as long as you need it.
On a final note, one question that is probably most googled, is “Can I put X in compost” where X is some food scrap. The short answer is yes. You can if you’re patient enough and willing to wait, compost literally anything. I mean anything2. If you’re trying to just get through the process as quickly and painlessly as possible and are willing to do the work to sort ahead of time, you can stick to the standard rules of composting seen here:
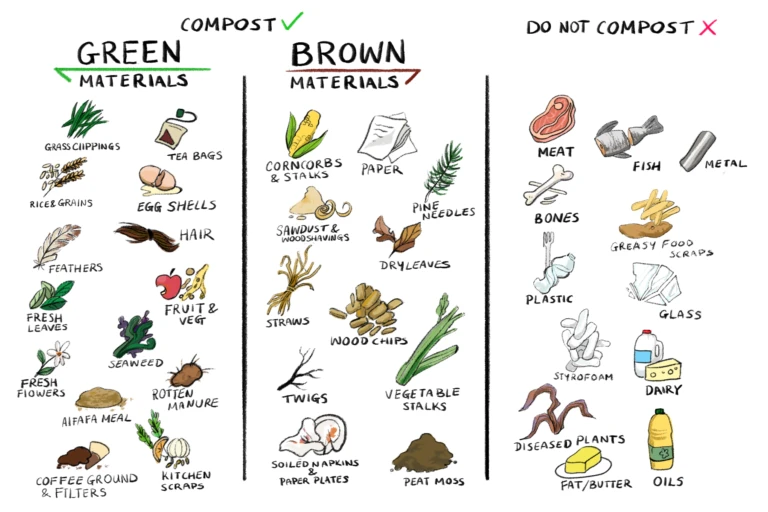
I would note that in the final section there, you shouldn’t add things like Glass, Metal, Styrofoam, or Plastic, even if using the “No Rule Composting” from the video in footnote 2, because those things don’t break down and aren’t organic. Things like meat, bones, and fish simply just take a very long time. But I tend to usually just throw all the leftovers from thanksgiving (i.e., the turkey carcass and all the scrapings) into the bottom of a pile and cover it will materials. It usually breaks down in about 6 months. With things like diseased plants, or weeds, you can toss those into a hot compost pit as the temp will kill weed seeds and disease at that 160 temp.
So get out there and start a pile of organic garbage for you and your neighbors. It’s fun, it’s easy, and the payoff is huge.
-EQ
https://deepgreenpermaculture.com/diy-instructions/hot-compost-composting-in-18-days/
www.youtube.com/watch?v=rx_gId5l0A8 - Off Grid w/ Doug & Stacy - Human Waste Composting
www.youtube.com/watch?v=fSIIEn1abc8 -RedGarden No Rules composting
Thank you so much for sharing! I've been wanting to compost and make my own gardening soil.